i m right 1st post G1 G2 G3 Mins GEN 1 GEN 2 GEN3
Flashing your Arnova GEN1 Arnova GEN2, Arnova GEN3
GEN1 flash SUPPORT MODEL
ARNOVA 10b
ARNOVA 10
ARNOVA 7
ARNOVA 8
ARNOVA 84
Flash Tool GEN 1 Hire : http://www.mediafire.com/?cbg6dzd9vww4nfv
Video Gide GEN 1 Hire :unbrick RK2818 with rkandroidbatchupgrade - YouTube!
GEN2 flash SUPPORT MODEL
ARNOVA 10 G2
ARNOVA 10 G2 philadelphialnquirer
ARNOVA 7 G2
ARNOVA 7b G2
ARNOVA 7e G2
ARNOVA 8 G2
ARNOVA 8 G2 Dual Tuch
GEN3 flash SUPPORT MODEL
ARNOVA 10d G3
ARNOVA 7B G3
ARNOVA 8 G3
ARNOVA Childpad Alvin capacitive
ARNOVA Childpad Alvin Resistive
Flash tool GEN2 GEN 3 hire http://www.mediafire.com/download.php?727ye83bty7ns2t
Arnova GEN3 Arnova GEN2 Video guide
Hire:Google Play (Android Market) on Arnova G3 and Arnova 9 G2 - YouTube!
Flashing your Arnova G1 Arnova G2, Arnova G3
Rockchip RK29xx/RK30xx based tablet with Rockchip
Arnova GEN1 GEN 2 GEN 3
1 Download and unpack the firmware you want to flash, please get the official firmware Hire : ARNOVA
for your device if you want to restore the tablet as stock or use a custom firmware.
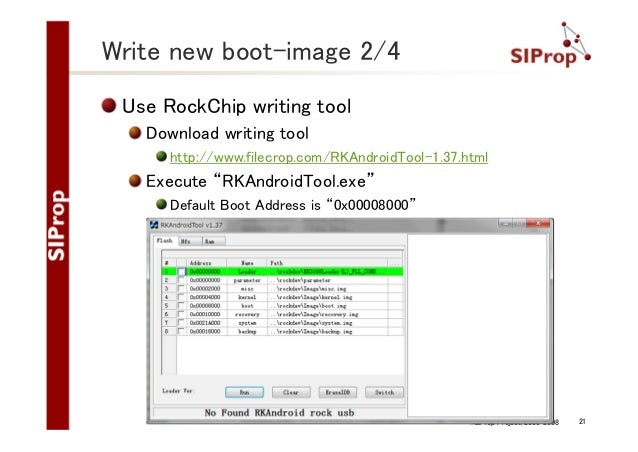
Download and unpack Rockchip_Batch_Tool_v1.5.zip (latest Rockchip Flasher tool version 1.5)
Shutdown the tablet, you may want to wait for a few seconds to make sure it does not restart
Execute the flashing tool RKBatchTool.exe on your computer
On Windows Vista or Windows Seven, you will have to Right Click on the program and select Run as Administrator
Arnova G32. Entering /recovery flashing mode on the tablet
You need to put the device in flashing/recovery mode to transfer the firmware firmware to the tablet with Rockchip tool.
The general idea is to put a paper clip in the reset pinhole of the tablet, combined with a button press. You first need to push the reset, holding it for a few seconds then press the activation button (depends on the tablet model) while holding the reset for a few seconds, then release the activation button and the reset.
push the Volume + button on your tablet and keep the button pressed while you insert a paperclip in the RESET pinhole. Keep the paperclip pushing the reset and the Volume + button pressed for about 15 seconds. The tablet screen should turn black.
On the Arnova 9 G2 :
insert a paperclip in the Reset pinhole of the tablet and press the Menu button
On the Arnova 9 G3 and ARCHOS 97 Carbon
insert a paperclip in the Reset pinhole of the tablet and press the Home button
On the Arnova 8 G2:
insert a paperclip in the Reset pinhole of the tablet and press the Power button
On the Arnova 7 G2:
put the Power switch to the right position (where a little lock is drown)
and insert a paperclip in the Reset pinhole on the back of the tablet.
On the Arnova 7b G2:
insert a paperclip in the Reset pinhole of the tablet and press the Power button
On the Arnova ChildPad:
insert a paperclip in the Reset pinhole of the tablet and press the Power button
On the Arnova 8c G3:
Switch the tablet off, press the volume- button, keep it pressed in and then connect the tablet with an usb cable to the computer.
3. Installing the drivers on the computer
Following the tablet entering in flashing mode, the computer should now show it has found a new USB device and prompt for a device driver. Select the appropriate driver in the driver directory from the Rockchip Flash Tool 1.4 package, then select the right folder that corresponds to your computer platform and operating systems.
There are 6 supported systems:
in drivers32bits folder you will find subdirectories for the following operating systems: (Windows 2000 drivers, Windows XP, Vista and Win7 in 32 bits).
in drivers64bits you have directories supporting (Windows Vista and Win7).
It will then install the driver for RK29 Device The setup wizard will display this screen when the driver installing is complete:
4. Transfering the firmware to the tablet
The flashing tool should display a green square around the number 1 in the lower left area of the Windows application.
Select the firmware file to flash using the button in the top right area of the application. Select the update.img file that you have prepared in the first steps. Note, the file can be named differently, it will be flashed anyway.Push the Upgrade button to transfer the selected firmware to the tablet.
It’s usually safer to use the Restore button rather than Upgrade to make sure the tablet system is properly erased prior to flash.
The firmware will be copied to the tablet, a progression counter will go from 0% to 100% on this step, followed by a verification.
You are done, let the tablet reboot and update itself. It should take a few minutes for the flash process to finish.

Downloading Android SDK. Compiling with Firefly Scripts. Compiling Without Script. Packing Rockchp Firmware. Partition Images. Unpack/Packing Rockchip Firmware. Rockchip Firmware Format. Installation of Tools. Unpacking Rockchip Firmware. Downloading Android SDK. Compiling with Firefly Scripts. Compiling Without Script. Packing Rockchp Firmware. Partition Images. Unpack/Packing Rockchip Firmware. Rockchip Firmware Format. Installation of Tools. Unpacking Rockchip Firmware. Device Brand: rockchip Device Manufact.: rockchip Device Model: rk292xesp8089 Device CPU: RK2928 Device IntName: rk292xesp8089 Device Version: 4.4.2 CUSWVer: rockchip Device Compile: 11/1/2014 2:42:01 AM Device ExtInfo: Q8S.


Rockchip Customization Tool Free
Unpack/Packing Rockchip Firmware Rockchip Firmware Format Installation of Tools Unpacking Rockchip Firmware Packing Rockchip Firmware Customization Customizing system.img 200 lines (160 sloc) 6.06 KB.